Before we begin, it’s important to note that creating MLOs requires a bit of technical knowledge and the use of specialized software. If you’re not familiar with 3D modeling or if you don’t have the necessary tools, you may want to consider learning about those topics first.
With that said, let’s get started!
What are MLOs?
MLOs, or multi-layered objects, are 3D objects that are used in GTA V to create complex and detailed environments. They can be used to create buildings, interiors, and other structures that are more detailed and realistic than what is possible with the game’s standard objects.
MLOs are particularly useful for creating custom maps or modifying existing maps in FiveM, a popular online multiplayer modification for GTA V. By using MLOs, you can create a more immersive and believable game world for your players.
Comparison: MLO / YMap
YMap
YMap is short for “YMAP file,” which is a file format used in FiveM to add custom objects to the game world. YMaps are used to create custom maps or to modify existing maps in the game.
Advantages of YMaps:
- YMaps are relatively easy to create and use.
- YMaps can be used to create custom maps or to modify existing maps in the game.
- YMaps can be used to add objects such as buildings, vehicles, and other objects to the game world.
- YMaps are relatively lightweight and have a minimal impact on the game’s performance.
Disadvantages of YMaps:
- YMaps are limited in terms of the level of detail and realism that they can achieve.
- YMaps are not suitable for creating highly detailed and complex objects, such as interiors of buildings.
MLO
MLO stands for “multi-layered object,” which is a 3D object used in FiveM to create complex and detailed environments. MLOs are particularly useful for creating custom maps or modifying existing maps in the game.
Advantages of MLOs:
- MLOs can be used to create highly detailed and realistic environments, such as interiors of buildings.
- MLOs are more flexible than YMaps, as they can be used to create a wider range of objects and environments.
Disadvantages of MLOs:
- MLOs are more complex to create and use than YMaps.
- MLOs require specialized software and technical knowledge to create.
- MLOs are heavier and can have a larger impact on the game’s performance compared to YMaps.
YMaps are a simpler and lighter option for adding custom objects to the game world, while MLOs are a more powerful and flexible option for creating highly detailed and realistic environments.
Setting up your development environment
Before you can start creating MLOs, you’ll need to set up your development environment. Here are the tools that you’ll need:
-
- A 3D modeling software: There are several software options available, such as Blender, 3DS Max, or Maya. You’ll need to choose one that you’re comfortable with and that meets your needs.
-
- A text editor: You’ll need a text editor to create and edit the configuration files that are used with MLOs. Any text editor will do, such as Notepad++ or Sublime Text.
-
- OpenIV: This is a tool that allows you to modify the game files for GTA V. You’ll need it to import and export your MLOs to and from the game.
-
- MLO Importer/Exporter: This is a script for Blender (or other 3D modeling software) that allows you to import and export MLOs from the game.
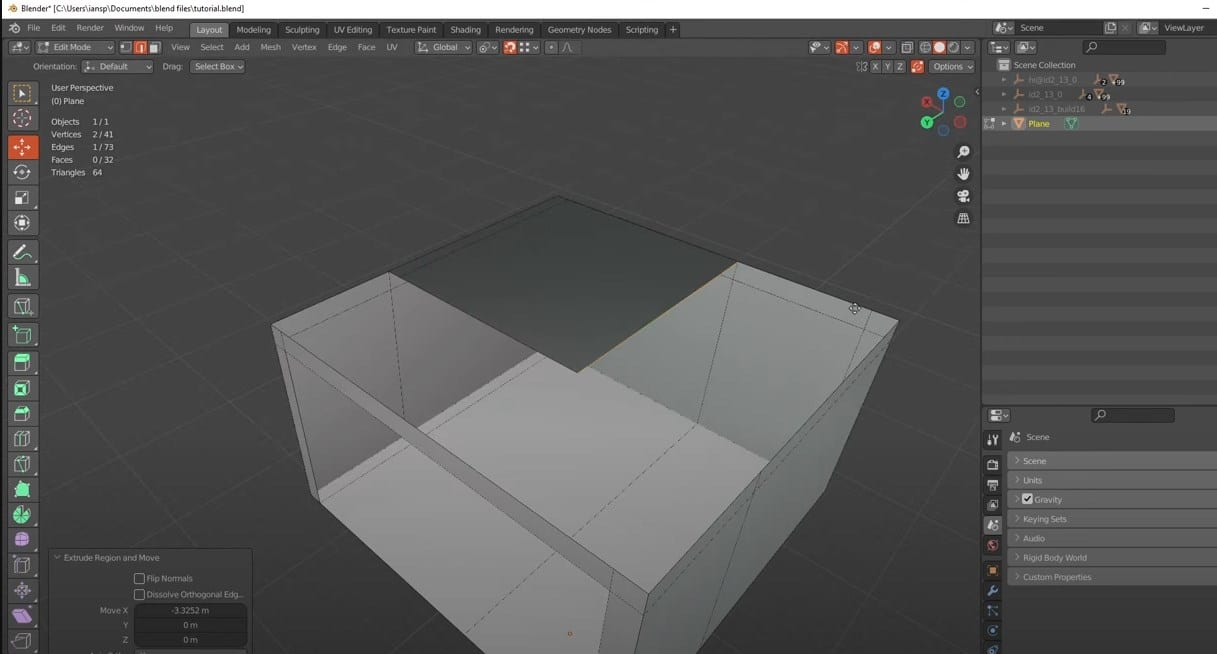
Creating an MLO
Now that you have your development environment set up, you’re ready to start creating your MLO. Here’s a step-by-step guide:
-
- Create a new project in your 3D modeling software.
- Create a new object and start modeling it. You can use any modeling techniques that you’re familiar with. Just make sure to keep your object within the following size limits:
– The maximum dimensions for an MLO are 2048x2048x2048 units.
– The maximum number of vertices (corners of a polygon) is 65,536. - When you’re finished modeling your object, it’s time to export it. Select your object and go to File > Export. Choose a location to save your file and give it a name. Make sure to save it as an OBJ file.
- Open the MLO Importer/Exporter script in your 3D modeling software. Select your object and run the script. This will create a new file called “mlo.xml” in the same folder as your OBJ file.
- Open the mlo.xml file in a text editor and modify the settings as needed. You can set the name of your MLO, its dimensions, and other properties.
- Open OpenIV and navigate to the location where you want to import your MLO. Create a new folder called “mlo” and import your OBJ and mlo.xml files into it.
- Start your server and test your built MLO.
Textures and materials
You can add textures and materials to your MLOs to make them more detailed and realistic. To do this, you’ll need to create a new material in your 3D modeling software and assign it to your object. Then, you can apply a texture to the material by selecting the material in the Material editor and assigning a texture image to it.
Keep in mind that the size of your textures can affect the performance of your MLO. It’s generally a good idea to use textures that are as small as possible while still looking good.
Add Collision
Collision is an important aspect of MLOs. It determines how the player and other objects can interact with your MLO. By default, MLOs have no collision, which means that the player and other objects can pass through them.
To add collision to your MLO, you’ll need to create a collision mesh. This is a separate object that defines the shape of the collision for your MLO. To create a collision mesh, you can use the same modeling techniques that you used to create your MLO. Just keep in mind that the collision mesh should be a simplified version of your MLO and should only include the parts that you want to be solid.
Once you’ve created your collision mesh, you’ll need to export it as an OBJ file and import it into your MLO folder in OpenIV, along with your mlo.xml file.
FPS Optimization
To ensure that your MLOs perform well in the game, it’s important to optimize them. Here are a few things you can do to optimize your MLOs:
-
- Keep the number of vertices as low as possible.
-
- Use simple, low-poly models whenever possible.
-
- Use textures that are as small as possible while still looking good.
-
- Avoid using too many materials and textures.
-
- Use the LOD (level of detail) system to reduce the complexity of your MLO at farther distances.
Video Tutorial
FAQ
What is the maximum size for an MLO?The maximum dimensions for a FiveM MLO are 2048x2048x2048 units.
How many vertices can an MLO have?The maximum number of vertices (corners of a polygon) for an MLO is 65,536.
How do I add textures and materials to my MLO?To add textures and materials to your MLO, you’ll need to create a new material in your 3D modeling software and assign it to your object. Then, you can apply a texture to the material by selecting the material in the Material editor and assigning a texture image to it.
How do I add collision to my MLO?To add collision to your MLO, you’ll need to create a collision mesh. This is a separate object that defines the shape of the collision for your MLO. To create a collision mesh, you can use the same modeling techniques that you used to create your MLO. Just keep in mind that the collision mesh should be a simplified version of your MLO and should only include the parts that you want to be solid. Once you’ve created your collision mesh, you’ll need to export it as an OBJ file and import it into your MLO folder in OpenIV, along with your mlo.xml file.
How do I optimize my MLO?To optimize your MLO, you can try these steps:
- Keep the number of vertices as low as possible.
- Use simple, low-poly models whenever possible.
- Use textures that are as small as possible while still looking good.
- Avoid using too many materials and textures.
- Use the LOD (level of detail) system to reduce the complexity of your MLO at farther distances.
By following our tutorial, you should be able to create high-quality MLOs that perform well in FiveM. I hope this tutorial has been helpful! Let me know if you have any questions remaining.